 Stone IdentifierGet the app
How to identify agate: clues to look for
Look for banding, inspect exposed surfaces and photograph your find. Use this agate identification guide to compare clues without damaging your stone.
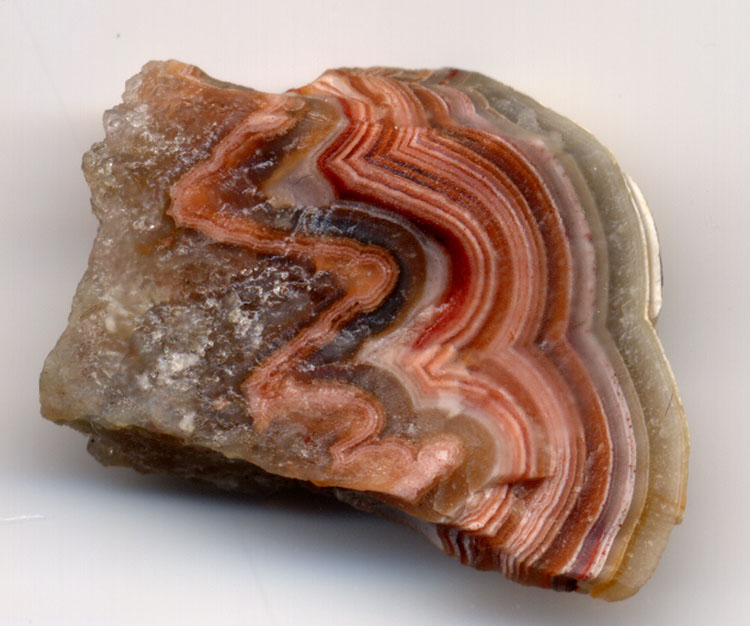
Start by looking for a visible banding pattern on an exposed face. In fortification agates, bands can form nested outlines, rather like the walls of a fort. That pattern is a helpful starting clue, but a striped photograph alone does not confirm that a stone is agate.
In this guide
The Minnesota Department of Natural Resources describes this pattern in Lake Superior agates. Its regional examples are useful references, not a rule that every agate must look exactly the same.
Look at an exposed face, not only the outer surface
Examine the surfaces you already have. If there is a natural opening, worn patch or previously cut face, photograph it alongside the whole specimen. Follow a visible band around the face: does it curve, close into a loop or disappear beneath the outer surface?
Keep your description literal. “Three pale curved bands” is more useful than “definitely an agate.” If the pattern is hidden, write that down. An unclear view is missing evidence, not a reason to break the stone open.
Use the reference photo carefully
The banded specimen above has an exposed face that makes its pattern easy to inspect. Your uncut find may not offer the same view. Compare the shape and arrangement of the visible lines rather than expecting an exact color match.
Make a short list of what matches and what does not. You might record a similar curved pattern but a different surface finish, or visible stripes that do not continue around the face. This keeps a promising resemblance from becoming an unsupported conclusion.
Photograph your find in three views
- Take one picture of the entire stone on a plain background.
- Take a close-up of the clearest pattern, keeping the camera steady.
- Take a second angle, plus a separate photograph with a ruler for scale.
Use daylight or even indoor lighting. Keep filters off and retain an unedited copy. If reflections obscure the surface, change the camera angle before changing the specimen. Add a note about whether the surface is rough, worn, cut or polished.
Compare suggestions with your observations
Use Rock Scan to explore possible matches, then return to the photographs and notes. Ask which visible features support the suggestion and which remain unexplained. An app can help you choose what to investigate next; it does not independently verify composition or origin.
Avoid choosing an identity from color alone or treating a seller's label as a test result. If the pattern remains unclear, a local mineral club or qualified examiner can help you decide what additional evidence would be useful.
Keep the specimen and its history together
Record where the stone came from, if known, and whether it was found, bought or inherited. Keep that history separate from assumptions about where it formed. Use our observation sheet to keep the notes with your photos.
Do not scratch, heat, acid-test or break a valued piece just to complete a checklist. For a clear or white specimen without useful banding, our quartz vs calcite comparison explains why appearance needs to be considered alongside other properties.
Sources
Take a closer look at your find
Use Rock Scan to explore possible matches from a photo. Compare the suggestion with the clues in this guide.
Open in App Store