Snowflake obsidian: how to read the pale patches
Snowflake obsidian is volcanic glass with pale patches formed where parts of the glass crystallized. Look for gray or white spots in a dark glassy background. Fine lines may radiate from the centers of some spots. Use those clues together and keep the identification provisional when only a photo is available.
In this guide
Start with the spots and the glass around them
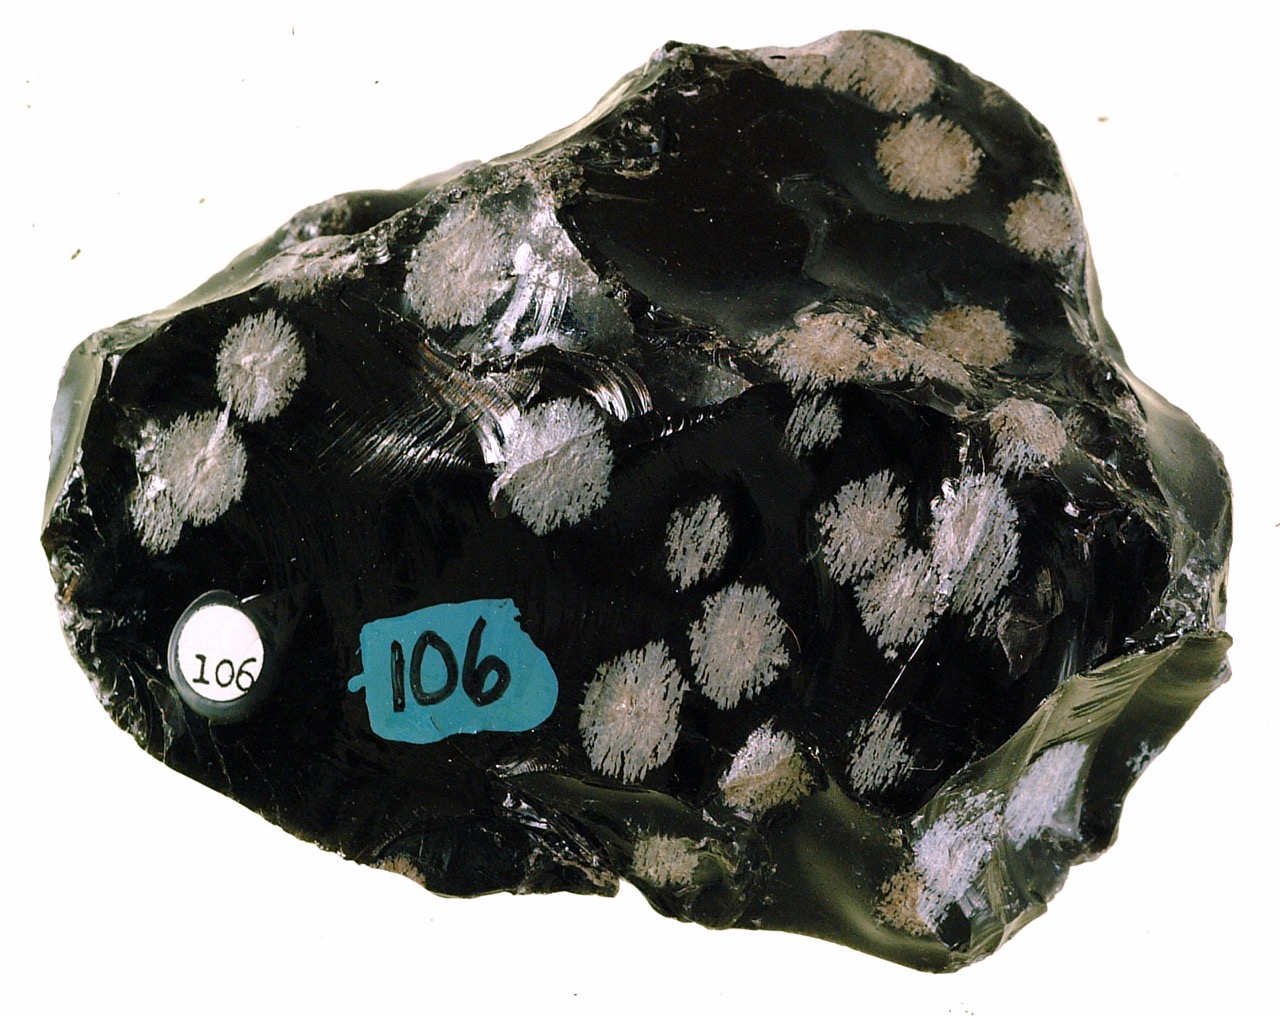
In the specimen above, pale spots interrupt a continuous, dark glassy surface. Look closely at a spot away from the brightest reflection. You can see a fuzzy edge and fine lines fanning out. Other spots look more rounded. A snowflake doesn't need six points to be a useful clue.
The photograph shows a documented specimen from near Millard, Utah, in the Ward’s University Rock Collection. The Geoscience Digital Image Library record gives its width as 8 cm. Use it as an example of the pattern and texture, rather than a size or locality test for a stone you found elsewhere.
 ROCK SCAN
Identify your rocks
Take a photo to explore a possible match.
iPhone and Android · In-app purchases
How the snowflakes form
Obsidian forms when lava cools quickly enough for much of it to solidify as glass. Over time, parts of the glass can crystallize. In the Smithsonian’s specimen 45995, the pale marks are radiating clusters of cristobalite. Geologists call the partial crystallization of glass devitrification. Geoscience Australia’s specimens show how different the resulting pattern can look beside ordinary dark obsidian.
Cristobalite and quartz both have the formula SiO₂, with different crystal structures. The dark background is volcanic glass. That distinction matters when describing the sample: snowflake obsidian names the rock, while cristobalite names a mineral found in its patches. The rock versus mineral guide explains how those two levels of identification fit together.
Follow one pale spot as you turn the stone
Set the specimen down in diffuse daylight. Choose a spot you can find again and take a photo. Rotate the stone slightly without moving the light. A bright reflection will usually shift across the surface, while a feature in the rock stays in the same place relative to neighboring spots.
Then examine a second exposed face. Look for pale spots within the dark material, the appearance of the dark surface between them and any existing curved fracture. A rounded or polished piece may hide the original fracture. An old rough surface may be dull, so record the finish along with what you see.
| What catches your eye | What to look at next |
|---|---|
| Several pale, roughly round patches | Compare the edges of a few patches. Some may have radiating detail. |
| A white streak on a shiny face | Change the viewing angle and check whether the streak moves with the reflection. |
| Pale material sitting in a pit or crack | Photograph the boundary. It may be a surface deposit or a filling. |
| Pale bands that run across the stone | Follow their direction and see whether they form layers or separate patches. |
These observations help you describe the pattern and narrow your shortlist. A close-up alone rarely resolves what the pale material is made of.
Compare a dark stone with the right reference
Plain obsidian can share the dark glassy appearance and curved breaks. To compare it with a banded specimen or a stone sold as onyx, use the obsidian versus onyx guide and follow the pale features across the surface. Continuous bands and isolated radiating patches give you different clues.
A dark rock with separate light grains can look spotted too. Focus on whether you see individual grains with distinct boundaries or clusters with fine lines radiating through a glassy background. Worn or polished pieces can make that distinction difficult. Artificial glass can also resemble natural glass. Keep the find location or seller's label with the photos and ask a qualified examiner if the distinction matters for a purchase.
If your specimen has no pale patches and is uniformly dark, use the obsidian vs. onyx comparison to check for clues in the surface and any bands.
Take a photo set that shows the pattern
- Photograph the whole piece in soft light. Leave room around the edges and include a scale in one view.
- Take a close-up of two or three patches and the dark material between them. Keep the edges of the patches in focus.
- Add a second angle of the same area so you can compare the spots with the reflections.
Use existing surfaces and leave sharp edges alone. If you scan your find with Stone Identifier, start with the whole specimen and compare the suggested match with your close-ups. A possible label such as “dark glassy rock with pale radiating patches” preserves the clues even when the name is still uncertain.
Sources
ROCK SCANIdentify your rocks
Take a photo to explore a possible match.
iPhone and Android · In-app purchases